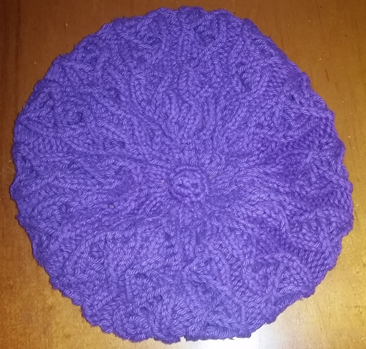
Top Down Beret Child to Adult Sizes by Linda Butler Copyright © 2014. Traditionally there are 3 basic outside diameters of the beret, measured across the top of the hat lying flat (10”, 10½” and 11”). I used the One Day Beret Recipe by Kirsten Kapur Designs Copyright © 2012 to add 2 smaller sizes Child and Teen to this traditional style Beret. Starting at the crown is often easier said than done but I like the result. I use the Pinhole Cast On method in this tutorial to cast on 4sts then I work 2 rows as though I was making an icord. This works for me I encourage you to experiment and find a method that works for you.
- Foundation Row 1: Don’t turn your work. Instead, slide your stitches to the other end of the needle they’re on. Pull the working yarn across the back of your stitches to begin. Knit into the front & back of each stitch, 8sts.
- Foundation Row 2: Repeat Foundation Row 1, 16sts.
- At this point I find I have enough stitches to divide onto dpn’s and start working in the round without dropping or twisting any stitches, mark the 8 increase positions by placing a stitch marker between every 2 stitches. Working 3 consecutive increase row/rounds makes the top of the hat a little flatter.
Note: These measurements are a guide adjust them to your personal requirements, finished head measurement should be approximately 1”-2” less than actual head measurement.
| Age/Size Guide | Diameter | Finished Head Size | To Fit Head Size |
| Child 8-12yrs | 9″ | 16″ | 17″-19″ |
| Teen | 9.5″ | 17.75″ | 19″-21″ |
| Adult sml | 10″ | 19.5″ | 21″-23″ |
| Adult med | 10.5″ | 21.33″ | 23″-24″ |
| Adult lge | 11″ | 23″ | 24″-25″ |
Materials: 200yds of a worsted weight yarn, 16″ circular needle sizes US8/5mm & US7/4.5mm, set of dpn’s size US8/5mm, stitch markers. Use different sized needles if needed to obtain the desired gauge.
Gauge: 4½sts/6rnds = 1 inch using the larger needles and working in st. st.
- Crown: Cast On 4sts, work 2 rnds increasing in every stitch. 16sts.
- Round 1 Increase: (K1b&f, Knit to marker). Repeat to end 24sts .
- Round 2: Knit.
- Repeat Rounds 1 & 2 until you have 14sts between each marker, a total of 112sts, approximately 8½” diameter.
Body (Half this amount is folded under)Work straight as follows: Child ½” for 9” dia (Teen 1” for 9½” dia, Small Adult 2” for 10” dia, Medium Adult 3” for 10½” dia, Large Adult 4” for 11” dia).
- Underside: Next Round: Knit.
- Round 1 Decrease: (K1, K2tog, Knit to marker) repeat to end.
- Round 2: Knit.
- Repeat Rounds 1 & 2 until the following number of stitches between each marker, 9 (10, 11, 12, 13)sts, a total of 72, (80, 88, 96, 104)sts.
Band: (a contrast color can be used for the band) Change to smaller needles and work in 1×1 rib for about ½” Child (¾” Teen, ¾” Small, 1″ Medium, 1” Large).
Join Hem: (Knit together 1 stitch from each needle, P1) repeat to end. Bind off loosely (I like to use “The decrease bind off” from Techniques by Theresa), Join every other stitch Knit tbl or iCord bind off with elastic.